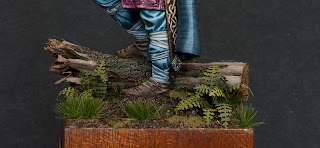
Originaly the Viking miniature comes with a base shaped as a stone step or something like that. As far as I know vikings culture was based on wood (I might be mistaken though), so I guess it symbolises mighty barbarians riding more architecturally advanced cultures (i.e. roman churches and monasteries). But for me the pose, and facial expression doesn't say conqueror after a battle looking at what they just plundered. It's more like a seasoned warrior, a chieftain, standing on a cliff looking at the sea, and planning new excursion, or maybe just thinking about what the future holds. That's one of the main reason, why there is no blood on the mini. And that's why I decided to create forest like base, with a fallen trunk (to substitute the step) and some fern and grass.
Here you can see all materials I used for the base: a bit of heather, etched brass, artificial grass, tobacco, grounded sponge, tea, sandy paste and some milliput.
Old branches of heather are great as tree trunks, mostly because they're rearly ideally oval in profile, there are very often some sort of deformations, indentations, recesses that create visual interest. Also the facture and size of the bark looks convincing in scale and represents tree bark very well. It also falls of really easily, leaving nice, smooth surfaces and it makes the trunk looks like old and damaged.
First I had to choose right piece of heather and cut it into the right size. I went for a branch with a split end, like it was broken by the wind or lightning, not cut down by the axe. Falling bark adds more character to it, making it look like something that's laying on the ground for a while now.
Cutting the other end was a bit more tricky though. Heather is pretty hard, so you need proper saw to cut it precisely.
Then I placed the cut piece on the base on a slight angle, with damaged end pointing the same direction the Viking will be looking in. It should create some harmony in the piece. Around the wood I placed some milliput to create ground and socket for other foot.
When I was happy with the shape of the ground, I covered it with sandy paste to add some texture. Even knowing that most of the ground will be covered in some sort of foliage, I thought it's a good move, just in case some of it will shine through.
With the ground more or less ready I reached to my tobacco stash to create some mushrooms on the trunk.
To be fair, the whole idea of using tobacco as mushrooms is not mine. The credit is due to guys from MassiveVoodoo, and here you can find the article that inspired me to try it on my bases. And here, if anyone's interested you can find a photo of the best 'mushroom material' I could find so far. I'm not gonna publish here the photo as I'm against smoking and I don't really advertise it any more than necessary.
With all that done I placed the mini on the base. First I had to cut a hole in the trunk to hide the piece of metal under viking's foot and started work with fern.
First I shaped some of the leafs in more natural way, trying to mimic different stages of growth. And then placed them around the trunk in bits of blutac, just to find out the shape of the plants. When I was happy with that, I placed some grass around, for now without glueing it, just to find out the right spots. Because I had to paint every fern separately, I took few photos from different angles to be able to place them more of less the same way after painting. And of course to make sure I won't mix them, I was keeping every bunch separately while painting. I took photos of this stages but I guess I lost them so you need to take my word for it.
With all foliage in place or at least planned, I could move to the moss and dead leafs on the ground. I decided to add dead leafs because even in the middle of vegetation period there is always some amount of fallen leafs under the big trees in the forest.
For the moss I used grounded sponge, you can buy in almost every hobby store. They come in various colours, and I decided to use slightly yellowish, warm shade of green to add some variety of colour. I glued it mostly under the trunk and fern.
A bit of glue between the tea makes it look even more like decaying foliage.
And at the very end I carefully placed few bits of bark around the trunk as if it just fallen of under the viking's shoe.
Viking's base, phase two - painting
cheers
'eM


Great work, amazing details!
ReplyDeleteI love it <3
ReplyDeleteHave you painted the trunk, or those colours are natural?
ReplyDeleteGreat work!
The trunk is painted. In my next tutorial (published most likely tomorrow) I'll explain why and how I painted it:)
Delete