This post has moved.
Read the updated article on Minichix Studio:
Adding Blood Effect in Miniature Painting the Easy Way.

19 Aug 2012
18 Aug 2012
19 days and counting
I just realised, I got only 19 free days left before EuroMilitaire, and typically for me, non of my entries are ready. So I guess I have two choices now.
1. I can simply panic and wait to see what's gonna happen - the most probable scenario here is me with only one, max two entries and huge pile of remorse, or
2. I can implement strict regime too meet the deadline with as little stress and sleepless nights as possible.
The second option is more favourable of course, but to be honest I'm not a big fan of any type of regime, so I'm not really sure what's gonna happen.
But just in case I'll get my act together, I can do some math now;]
19 days can give me from 190 to 230 painting hours (depends on the level of dedication). Well let's say 200, to leave some time for other activities than painting and sleeping. In this time I have to finish 5 miniatures (4 entries and something I simply need to finish before euro) so it gives me 40 h per mini. And all of them are more or less advanced WIP, so it looks like 40 h should be enough time to finish every single one. At least I think so:D Life may have different opinion on that subject.
And what do you think? Is 40h enough time to finish a bigger scale miniature, or am I simply kidding myself?
cheers
'eM
12 Aug 2012
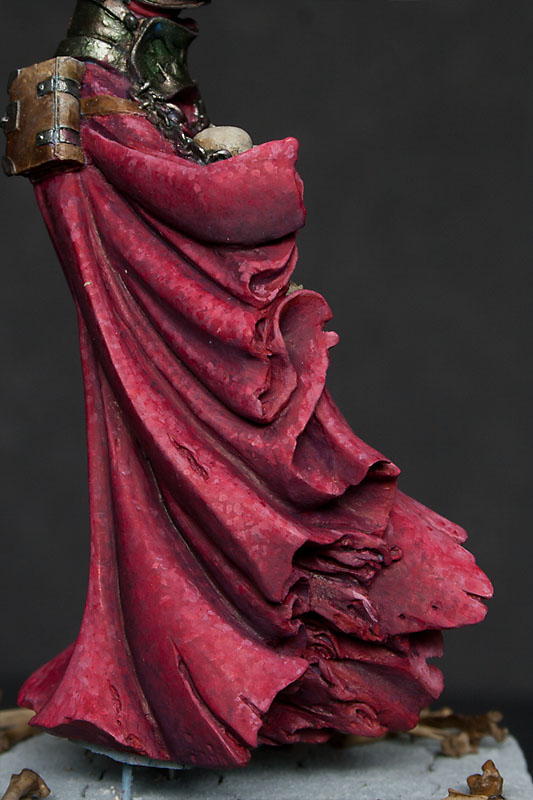
Textures - crushed velvet
This time I'll try to explain how I did the velvet robe on Menhom Dark Shadow.

I started the robe as plain red. As you can see I even added some initial lights and shadows. But then I realised that this robe is big enough (I'd even say huge) to add some freehand, or maybe texture.
Because initially I was going for old and dusty look, the embroidery, I was going to mimic with freehand, would have to be fairly damaged. I wasn't sure if I'll be able to do that, so I decided to go with crumpled velvet look.
To do that I decided to try 'doting' technique presented by Alexi_Z in her video tutorial. That was my first try, so the results are far from ideal, but I'm quite happy anyway. I learnt a lot doing that piece, and the next attempt should be more successful.
On the first two pictures you can see the initial shading on the robe. It's not perfectly smooth or too contrasty, but it's OK. I'm gonna cover it with lots of dots.


When I made my mind how exactly I I'm gonna paint the robe, I did a little try on one of the creases to find out If I'm capable of pulling that off.

It looked quite nice, so I started to build shadows.
On the pictures below you can see how I was trying to control depth of the shadows not only by used colour, but also by placing more or less dark dots in the recesses.


Then I started to add dots with brighter colours to create lights. Like with painting smooth surface I was building lights gradually, by change of colour and placement of the dots.


Later it was mostly going back and forth with various shades to build a nice gradient. I used quite a lot of base colour to make shadows and lights less uniform. To soften the transitions a bit and made it look more like a fabric, not just collection of dots, I used some red glazes.


And here, finished robe, with some final highlights on the edges.


And at the end, colours I used to paint the robe, maybe someone will find it helpful. I know that I'm using some really old and discontinued GW colours, but you can easily find something similar in other ranges.
Base:
Red Gore (GW)
Highlights:
1st light Andrea Flesh Paint Set
Offwhite (70820 VMC)
Shadows:
Liche Purple (GW)
Storm Blue (GW)
Black (70950 VMC)
Washes (GW):
Baal red
Devlan mud
Leviathan purple
Thraka green
cheers
'eM

I started the robe as plain red. As you can see I even added some initial lights and shadows. But then I realised that this robe is big enough (I'd even say huge) to add some freehand, or maybe texture.
Because initially I was going for old and dusty look, the embroidery, I was going to mimic with freehand, would have to be fairly damaged. I wasn't sure if I'll be able to do that, so I decided to go with crumpled velvet look.
To do that I decided to try 'doting' technique presented by Alexi_Z in her video tutorial. That was my first try, so the results are far from ideal, but I'm quite happy anyway. I learnt a lot doing that piece, and the next attempt should be more successful.
On the first two pictures you can see the initial shading on the robe. It's not perfectly smooth or too contrasty, but it's OK. I'm gonna cover it with lots of dots.


When I made my mind how exactly I I'm gonna paint the robe, I did a little try on one of the creases to find out If I'm capable of pulling that off.

It looked quite nice, so I started to build shadows.
On the pictures below you can see how I was trying to control depth of the shadows not only by used colour, but also by placing more or less dark dots in the recesses.


Then I started to add dots with brighter colours to create lights. Like with painting smooth surface I was building lights gradually, by change of colour and placement of the dots.

Later it was mostly going back and forth with various shades to build a nice gradient. I used quite a lot of base colour to make shadows and lights less uniform. To soften the transitions a bit and made it look more like a fabric, not just collection of dots, I used some red glazes.


On the pictures below you can see the difference glazes did. Colour is more vibrant, and whole robe looks more consistent.


And here, finished robe, with some final highlights on the edges.


And at the end, colours I used to paint the robe, maybe someone will find it helpful. I know that I'm using some really old and discontinued GW colours, but you can easily find something similar in other ranges.
Base:
Red Gore (GW)
Highlights:
1st light Andrea Flesh Paint Set
Offwhite (70820 VMC)
Shadows:
Liche Purple (GW)
Storm Blue (GW)
Black (70950 VMC)
Washes (GW):
Baal red
Devlan mud
Leviathan purple
Thraka green
cheers
'eM
8 Aug 2012
Spiderman - mission almost impossible!!
The word 'almost' is a key here...

I still can't believe I managed to assembly this little bastard. On the left picture below you can see red lines where the mini was cut by the producer. I'd love to shake hand of the person who made that decision... seriously dude congratulations...
On top of that, right arm was a 'tiny bit' too short (check on the pictuers the amount of Milliput I used), and basically I had to guess how exactly should I glue his arms to the shoulders. And to be honest, tight space between his legs didn't left too much room for tweezers.


But after a countless hours of heavily swearing, sweating, throwing the mini back in the box, and even trying to bribe Mr Bombel to eat his head (one little head = one can of tuna, sadly he didn't go for it), it looks like the mini is ready for a primer.
If the primer won't show me any uneven places (you can imagine it's rather tight there around his arms) painting should be piece of cake.
So please, finger crossed guys, and I'm off to my painting station;]
cheers
'eM
7 Aug 2012
Medusa - review
Miss Medusa is with me for a while now, so I guess it's time to introduce her to you guys:D
The bust was sculpted by Allan Carrasco, and it's my second piece from this sculptor (the first one is disturbingly detailed but beautiful Succubus), done for Lugdunum Figurines Club for their 10th anniversary. I bought it directly from their website Transaction itself was swift and very pleasant, so I can recommend it to everyone. If you want Medusa for yourself, just send them an email:)
OK, enough pleasantries, let's cut to the chase. Let's take a look at our beauty.
She arrived in a plastic bag covered with paper band, as you can see on the pictures below (the outer box was stuffed enough so the bust was properly secured).


Bust consists of 8 parts: body, head and 6 pieces of snakes. They seem to be rather clean, but some work will be needed after all.


Body is definitely the best part when it comes to the cast, there is just one mould line at the back and few air bubbles at the bottom (they're not even visible when you look at the front of the model, but need to be filled anyway).
Head is more complicated. Face part is almost clean, with just little air bubbles and other imperfections on the chin, but this part will be easy to clean and I need to mask joining point with the neck anyway, so it's not a problem at all. Snakes on the other hand will need some more serious cleaning up and some work with joining the separate snakes with the rest. But what can we expect? It's very complicated part and I guess some imperfections are understandable.
The joining point seems to be well prepared and both parts fit together very well. Of course I'll have to hide it with some putty but it's in a spot where skin can fold a bit, especially under the chin, so it should be easy to conceal.
At this point I have no idea how much 'fun' will bring attaching snakes, but I'll find out soon enough (and of course will share the knowledge with you;p)


At the end I tried to take some pictures of snakes heads, to show you how detailed they are, but I'm not sure if you'll be able to see anything;]


I'm not very good at scoring miniatures, and all that, but I do like that bust. I find the quality good enough and I hope that I'll have some fun painting it.
And hopefully this little review will be of any help to you.
cheers
'eM
The bust was sculpted by Allan Carrasco, and it's my second piece from this sculptor (the first one is disturbingly detailed but beautiful Succubus), done for Lugdunum Figurines Club for their 10th anniversary. I bought it directly from their website Transaction itself was swift and very pleasant, so I can recommend it to everyone. If you want Medusa for yourself, just send them an email:)
OK, enough pleasantries, let's cut to the chase. Let's take a look at our beauty.
She arrived in a plastic bag covered with paper band, as you can see on the pictures below (the outer box was stuffed enough so the bust was properly secured).


On the inner side of the paper band is something you don't see very often. A
short instruction where should we glue all the snakes. It's in french,
and I don't understand a word, but it's helpful anyway.

Bust consists of 8 parts: body, head and 6 pieces of snakes. They seem to be rather clean, but some work will be needed after all.


Body is definitely the best part when it comes to the cast, there is just one mould line at the back and few air bubbles at the bottom (they're not even visible when you look at the front of the model, but need to be filled anyway).
Head is more complicated. Face part is almost clean, with just little air bubbles and other imperfections on the chin, but this part will be easy to clean and I need to mask joining point with the neck anyway, so it's not a problem at all. Snakes on the other hand will need some more serious cleaning up and some work with joining the separate snakes with the rest. But what can we expect? It's very complicated part and I guess some imperfections are understandable.
The joining point seems to be well prepared and both parts fit together very well. Of course I'll have to hide it with some putty but it's in a spot where skin can fold a bit, especially under the chin, so it should be easy to conceal.
At this point I have no idea how much 'fun' will bring attaching snakes, but I'll find out soon enough (and of course will share the knowledge with you;p)


At the end I tried to take some pictures of snakes heads, to show you how detailed they are, but I'm not sure if you'll be able to see anything;]


I'm not very good at scoring miniatures, and all that, but I do like that bust. I find the quality good enough and I hope that I'll have some fun painting it.
And hopefully this little review will be of any help to you.
cheers
'eM
30 Jul 2012
Textures - some sort of weird introduction
Recently I've been thinking about texturing that imitates fabrics on miniatures (due to my two beautiful Pegaso boys). Which scale is big enough to give it a try, to make it look natural, not only to show off.
Should we do that while painting miniatures up to 90mm, or maybe only bigger? Does it look realistic, or not really?
Sure, when it's done right it looks pretty awesome (for a freehand), shows the skill and dedication of the painter (you know, all these long hours he/she spent painting all the tiny lines). But is it necessary and believable?
Does it add more realism to the mini, or maybe is a bit over the top? I must say I do have my doubts, but still didn't make my mind.
Let's think about it for a moment, and look at some pictures:
Here are some close-ups of contemporary fabrics and photos of clothes made of them.


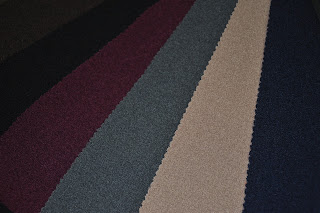


Linen


Velvet


I don't think threads of any of these fabrics would be visible even in scale 1:20. Well maybe except of thickest wools and roughest linen. And of course old and crumpled velvet, but that's completely different thing.
But you may say: it's all contemporary fabrics, made by fancy machines. And what about old times?
Personally I don't really think it was that much different from now. Of course the technology of weaving, and used tools were different, but let's give some credit to our ancestors. Even in the middle ages people were able to weave some fine and delicate fabrics.
Quoting Vikings Online:
"The Vikings were not the barbarians that our Victorian forefathers imagined, so extremely coarsely woven cloth such as sack cloth, is not required for clothing. 10 threads per centimeter was average, whilst 60 threads per centimeter was not uncommon for extremely fine material." Source
Let's do the math:
10 threads per 1 cm, 1mm thick thread, and in scale:
- 1:10 it's 1/10mm thick single thread,
- 1:20 it's 1/20mm thick single thread,
- 1:35 it's 1/35mm thick single thread.
And that's the thick wool... Made by Vikings. How much better should it be on royal courts in more developed parts of the world?
Here are some examples of real medieval fabrics found in archeological excavations.


As you can see it's not that primitive and thick as we could imagine.
Looking only from that point of view, all attempts to recreate a fabric on a mini smaller than 1:10 is kinda pointless. Try to imagine how extremely thick would it be when increased to the real size...
Silly, isn't it??:>
But on the other hand....
Textured fabrics, if done properly, and not on every single piece of clothing, definitely add some visual interest to the mini (even if it hurts a little when we think about the 'real' thickness of the painted fabric).
After all, the contrast we build on a mini is way out of proportion to the real life, but it helps to show three-dimensional of the mini.
So maybe textured fabrics, if done with some sense, may be a really nice addition to the mini and not only show off?
I really don't know;p I'll probably try at some point just to prove myself that I can do that good enough. And even said that, I don't think I'd ever dare to 'recreate' threads of silk or other delicate fabrics or on clothes of nobility and kings, but maybe on a woolen cloak it wouldn't be too bad?
And there is one more aspect of this textured affair...
Maybe it's only a temporary trend to paint fabric's threads everywhere it's possible, just to push the border of what's possible in this hobby a little bit further? Maybe it will pass at some point and we'll all get back to the smooth painting?
How do you think?
Am I making mountains out of molehills, or do we have a topic for valid discusion?
cheers
'eM
Should we do that while painting miniatures up to 90mm, or maybe only bigger? Does it look realistic, or not really?
Sure, when it's done right it looks pretty awesome (for a freehand), shows the skill and dedication of the painter (you know, all these long hours he/she spent painting all the tiny lines). But is it necessary and believable?
Does it add more realism to the mini, or maybe is a bit over the top? I must say I do have my doubts, but still didn't make my mind.
Let's think about it for a moment, and look at some pictures:
Here are some close-ups of contemporary fabrics and photos of clothes made of them.
Silk


Wool


Linen


Velvet


I don't think threads of any of these fabrics would be visible even in scale 1:20. Well maybe except of thickest wools and roughest linen. And of course old and crumpled velvet, but that's completely different thing.
But you may say: it's all contemporary fabrics, made by fancy machines. And what about old times?
Personally I don't really think it was that much different from now. Of course the technology of weaving, and used tools were different, but let's give some credit to our ancestors. Even in the middle ages people were able to weave some fine and delicate fabrics.
Quoting Vikings Online:
"The Vikings were not the barbarians that our Victorian forefathers imagined, so extremely coarsely woven cloth such as sack cloth, is not required for clothing. 10 threads per centimeter was average, whilst 60 threads per centimeter was not uncommon for extremely fine material." Source
Let's do the math:
10 threads per 1 cm, 1mm thick thread, and in scale:
- 1:10 it's 1/10mm thick single thread,
- 1:20 it's 1/20mm thick single thread,
- 1:35 it's 1/35mm thick single thread.
And that's the thick wool... Made by Vikings. How much better should it be on royal courts in more developed parts of the world?
Here are some examples of real medieval fabrics found in archeological excavations.
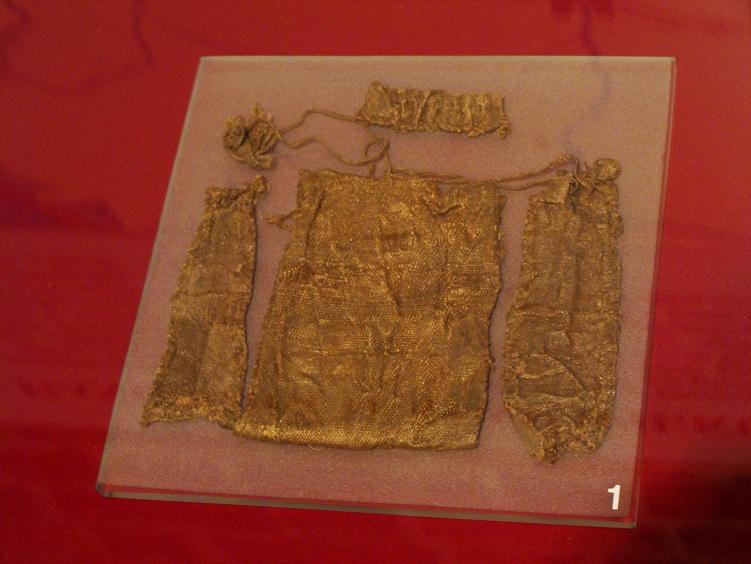

silk brocade

silk
source
source


wool
source
source
As you can see it's not that primitive and thick as we could imagine.
Looking only from that point of view, all attempts to recreate a fabric on a mini smaller than 1:10 is kinda pointless. Try to imagine how extremely thick would it be when increased to the real size...
Silly, isn't it??:>
But on the other hand....
Textured fabrics, if done properly, and not on every single piece of clothing, definitely add some visual interest to the mini (even if it hurts a little when we think about the 'real' thickness of the painted fabric).
After all, the contrast we build on a mini is way out of proportion to the real life, but it helps to show three-dimensional of the mini.
So maybe textured fabrics, if done with some sense, may be a really nice addition to the mini and not only show off?
I really don't know;p I'll probably try at some point just to prove myself that I can do that good enough. And even said that, I don't think I'd ever dare to 'recreate' threads of silk or other delicate fabrics or on clothes of nobility and kings, but maybe on a woolen cloak it wouldn't be too bad?
And there is one more aspect of this textured affair...
Maybe it's only a temporary trend to paint fabric's threads everywhere it's possible, just to push the border of what's possible in this hobby a little bit further? Maybe it will pass at some point and we'll all get back to the smooth painting?
How do you think?
Am I making mountains out of molehills, or do we have a topic for valid discusion?
cheers
'eM
Subscribe to:
Posts (Atom)