Ok guys:D Euro Militaire in less than 2 weeks now! Time for panick, at least for me!!
So who will be attending the show this year? Who will I have a chance to meet? Hopefully it's gonna be lot's of us and this year will be even better show than 2011;]
And if you don't know me, but you want to say hello, just look for overly excited dark haired chick, trying to buy everything. That's gonna be me:P
see you soon:D
'eM

9 Sept 2012
6 Sept 2012
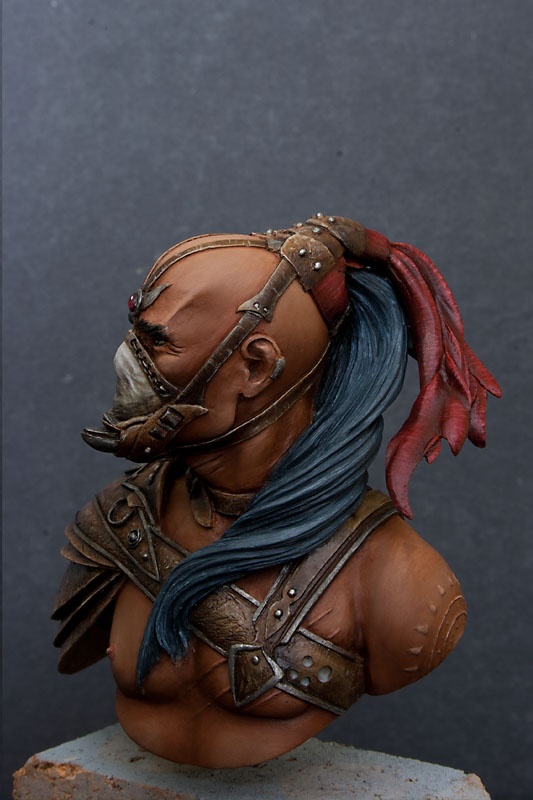
The Grinder - little update
Still lots to do, mostly skin (and eyebrows!!), but I guess I can see the end here;]
Leather elements and that fabric around his hair are finished.
Hair itself and metal elements need some final definition. Other than that, only skin left.
At this point I must say I'm particularly happy with the look of the cloth (some close-ups below). That was the first time I was trying to mimic this kind of texture.
And what do you think? Does it look real or not really?


cheers
'eM
3 Sept 2012
Textures - leather
This tutorial has been relocated to my main site, Minichix Studio.
Read the full article: Theory of painting realistic leather on miniatures.
Read the full article: Theory of painting realistic leather on miniatures.
19 Aug 2012
First blood - step by step
This post has moved.
Read the updated article on Minichix Studio:
Adding Blood Effect in Miniature Painting the Easy Way.
Read the updated article on Minichix Studio:
Adding Blood Effect in Miniature Painting the Easy Way.
18 Aug 2012
19 days and counting
I just realised, I got only 19 free days left before EuroMilitaire, and typically for me, non of my entries are ready. So I guess I have two choices now.
1. I can simply panic and wait to see what's gonna happen - the most probable scenario here is me with only one, max two entries and huge pile of remorse, or
2. I can implement strict regime too meet the deadline with as little stress and sleepless nights as possible.
The second option is more favourable of course, but to be honest I'm not a big fan of any type of regime, so I'm not really sure what's gonna happen.
But just in case I'll get my act together, I can do some math now;]
19 days can give me from 190 to 230 painting hours (depends on the level of dedication). Well let's say 200, to leave some time for other activities than painting and sleeping. In this time I have to finish 5 miniatures (4 entries and something I simply need to finish before euro) so it gives me 40 h per mini. And all of them are more or less advanced WIP, so it looks like 40 h should be enough time to finish every single one. At least I think so:D Life may have different opinion on that subject.
And what do you think? Is 40h enough time to finish a bigger scale miniature, or am I simply kidding myself?
cheers
'eM
12 Aug 2012
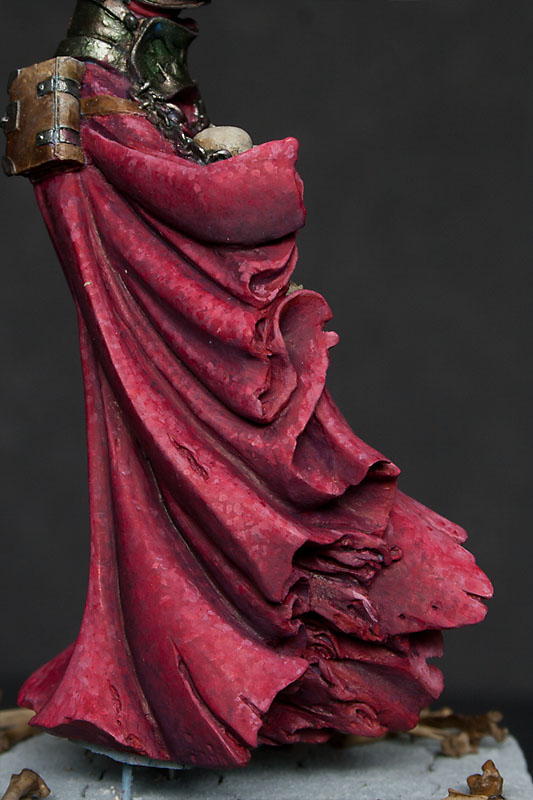
Textures - crushed velvet
This time I'll try to explain how I did the velvet robe on Menhom Dark Shadow.

I started the robe as plain red. As you can see I even added some initial lights and shadows. But then I realised that this robe is big enough (I'd even say huge) to add some freehand, or maybe texture.
Because initially I was going for old and dusty look, the embroidery, I was going to mimic with freehand, would have to be fairly damaged. I wasn't sure if I'll be able to do that, so I decided to go with crumpled velvet look.
To do that I decided to try 'doting' technique presented by Alexi_Z in her video tutorial. That was my first try, so the results are far from ideal, but I'm quite happy anyway. I learnt a lot doing that piece, and the next attempt should be more successful.
On the first two pictures you can see the initial shading on the robe. It's not perfectly smooth or too contrasty, but it's OK. I'm gonna cover it with lots of dots.


When I made my mind how exactly I I'm gonna paint the robe, I did a little try on one of the creases to find out If I'm capable of pulling that off.

It looked quite nice, so I started to build shadows.
On the pictures below you can see how I was trying to control depth of the shadows not only by used colour, but also by placing more or less dark dots in the recesses.


Then I started to add dots with brighter colours to create lights. Like with painting smooth surface I was building lights gradually, by change of colour and placement of the dots.


Later it was mostly going back and forth with various shades to build a nice gradient. I used quite a lot of base colour to make shadows and lights less uniform. To soften the transitions a bit and made it look more like a fabric, not just collection of dots, I used some red glazes.


And here, finished robe, with some final highlights on the edges.


And at the end, colours I used to paint the robe, maybe someone will find it helpful. I know that I'm using some really old and discontinued GW colours, but you can easily find something similar in other ranges.
Base:
Red Gore (GW)
Highlights:
1st light Andrea Flesh Paint Set
Offwhite (70820 VMC)
Shadows:
Liche Purple (GW)
Storm Blue (GW)
Black (70950 VMC)
Washes (GW):
Baal red
Devlan mud
Leviathan purple
Thraka green
cheers
'eM

I started the robe as plain red. As you can see I even added some initial lights and shadows. But then I realised that this robe is big enough (I'd even say huge) to add some freehand, or maybe texture.
Because initially I was going for old and dusty look, the embroidery, I was going to mimic with freehand, would have to be fairly damaged. I wasn't sure if I'll be able to do that, so I decided to go with crumpled velvet look.
To do that I decided to try 'doting' technique presented by Alexi_Z in her video tutorial. That was my first try, so the results are far from ideal, but I'm quite happy anyway. I learnt a lot doing that piece, and the next attempt should be more successful.
On the first two pictures you can see the initial shading on the robe. It's not perfectly smooth or too contrasty, but it's OK. I'm gonna cover it with lots of dots.


When I made my mind how exactly I I'm gonna paint the robe, I did a little try on one of the creases to find out If I'm capable of pulling that off.

It looked quite nice, so I started to build shadows.
On the pictures below you can see how I was trying to control depth of the shadows not only by used colour, but also by placing more or less dark dots in the recesses.


Then I started to add dots with brighter colours to create lights. Like with painting smooth surface I was building lights gradually, by change of colour and placement of the dots.

Later it was mostly going back and forth with various shades to build a nice gradient. I used quite a lot of base colour to make shadows and lights less uniform. To soften the transitions a bit and made it look more like a fabric, not just collection of dots, I used some red glazes.


On the pictures below you can see the difference glazes did. Colour is more vibrant, and whole robe looks more consistent.


And here, finished robe, with some final highlights on the edges.


And at the end, colours I used to paint the robe, maybe someone will find it helpful. I know that I'm using some really old and discontinued GW colours, but you can easily find something similar in other ranges.
Base:
Red Gore (GW)
Highlights:
1st light Andrea Flesh Paint Set
Offwhite (70820 VMC)
Shadows:
Liche Purple (GW)
Storm Blue (GW)
Black (70950 VMC)
Washes (GW):
Baal red
Devlan mud
Leviathan purple
Thraka green
cheers
'eM
8 Aug 2012
Spiderman - mission almost impossible!!
The word 'almost' is a key here...

I still can't believe I managed to assembly this little bastard. On the left picture below you can see red lines where the mini was cut by the producer. I'd love to shake hand of the person who made that decision... seriously dude congratulations...
On top of that, right arm was a 'tiny bit' too short (check on the pictuers the amount of Milliput I used), and basically I had to guess how exactly should I glue his arms to the shoulders. And to be honest, tight space between his legs didn't left too much room for tweezers.


But after a countless hours of heavily swearing, sweating, throwing the mini back in the box, and even trying to bribe Mr Bombel to eat his head (one little head = one can of tuna, sadly he didn't go for it), it looks like the mini is ready for a primer.
If the primer won't show me any uneven places (you can imagine it's rather tight there around his arms) painting should be piece of cake.
So please, finger crossed guys, and I'm off to my painting station;]
cheers
'eM
Subscribe to:
Posts (Atom)